Thursday, March 24, 2011

Can I Brag About My Kitchen Cabinets?

Throughout this remodeling process we've valued the various do-it-yourself forums and remodeling websites.  There's so much information out there; it's awesome!  One piece of advice that worked out very well for us was that we shouldn't be afraid to contact custom cabinet makers in our local area when getting quotes. 

Because our household is so crazy we were looking for strong, well-made cabinets that could stand up to the challenges we'd dish out.  But we were also looking for something with simple lines and not too stuffy, maybe a little bit rustic even.  I knew I wanted oak or hickory so the cabinets could compete visually with our fieldstone fireplace. 

We looked at home improvement stores, cabinet stores and an area custom cabinet maker.  Our local Menard's had a sale going and they had a decent selection, but for the same price, we were able to get custom cabinets instead of semi-custom, which meant no filler pieces (aka no wasted space). 

At one cabinet store, the salesman wouldn't listen to me at all.  Despite my detailed explanation of what I was looking for, he kept pushing upgrades like scrollwork and glazing, and at the same time trying to talk me out of quality materials, like thick plywood sides, etc.  I was furious by the time I left there.  Although very popular, a tuscan-themed kitchen would probably look pretty silly in our '70s ranch. 

The owner of the cabinet shop and his designer came out to our modest home and helped put together a plan for our less-than-ideal kitchen space-a long, narrow room that includes the main thoroughfare for the house.  Very polite and professional; I never guessed that they deal mainly with wealthy customers and businesses.  I found out about it later when I found a magazine article about them on the internet. 

We had some issues once our order was placed because they were used to dealing with designers/contractors that know how ordering cabinets works and we had no clue.  (We were the general contractor and therefore the main contact.) We really needed someone to hold our hand through the process which they weren't used to doing, so things moved slower than we expected.  Also, since our order was so small compared to their other customers, we weren't a high priority, which they explained as gently as they could.  I appreciated their honesty but it did sting a little.  $10K is a lot of money for us even if it isn't for others.  Despite that harsh reality, they were really nice and I never felt foolish or unappreciated while working with them.

Once again being a brute of a woman pays off :-)
I really enjoy demolition work!
To save some money, we ripped out the old kitchen ourselves.  We combined two rooms (making sure the wall we took out wasn't load-bearing) and tore out the Zbrick backsplash and L-shaped configuration of cabinets, which was harder to do than it looked.  (Originally the kitchen was going to be the last room we updated, but after I almost spilled boiling pasta water on my youngest child as she was racing around the corner, the plan changed and it became a priority.) 

Once the cabinets arrived, I was smitten with how lovely and well-made they were.  Our contractor had them up in a jiffy and asked to use pictures of the installed cabinets for their website.  They said their quality craftsmanship made them easy to install.

First day of cabinet installation
There were only a couple of glitches, most due to errors on our end.  (HINT:  When ordering a refrigerator or other appliance online, make sure you verify what the dimensions are.  Our refrigerator box was almost too short for the fridge because we didn't verify the accuracy of the specs posted on the appliance seller's website.  It came back to bite us when we couldn't put in tile floor because of it.)

So, to those forum posters who suggested contacting your local custom cabinet maker to check out what they offer, THANK YOU!  I would have never considered them otherwise.


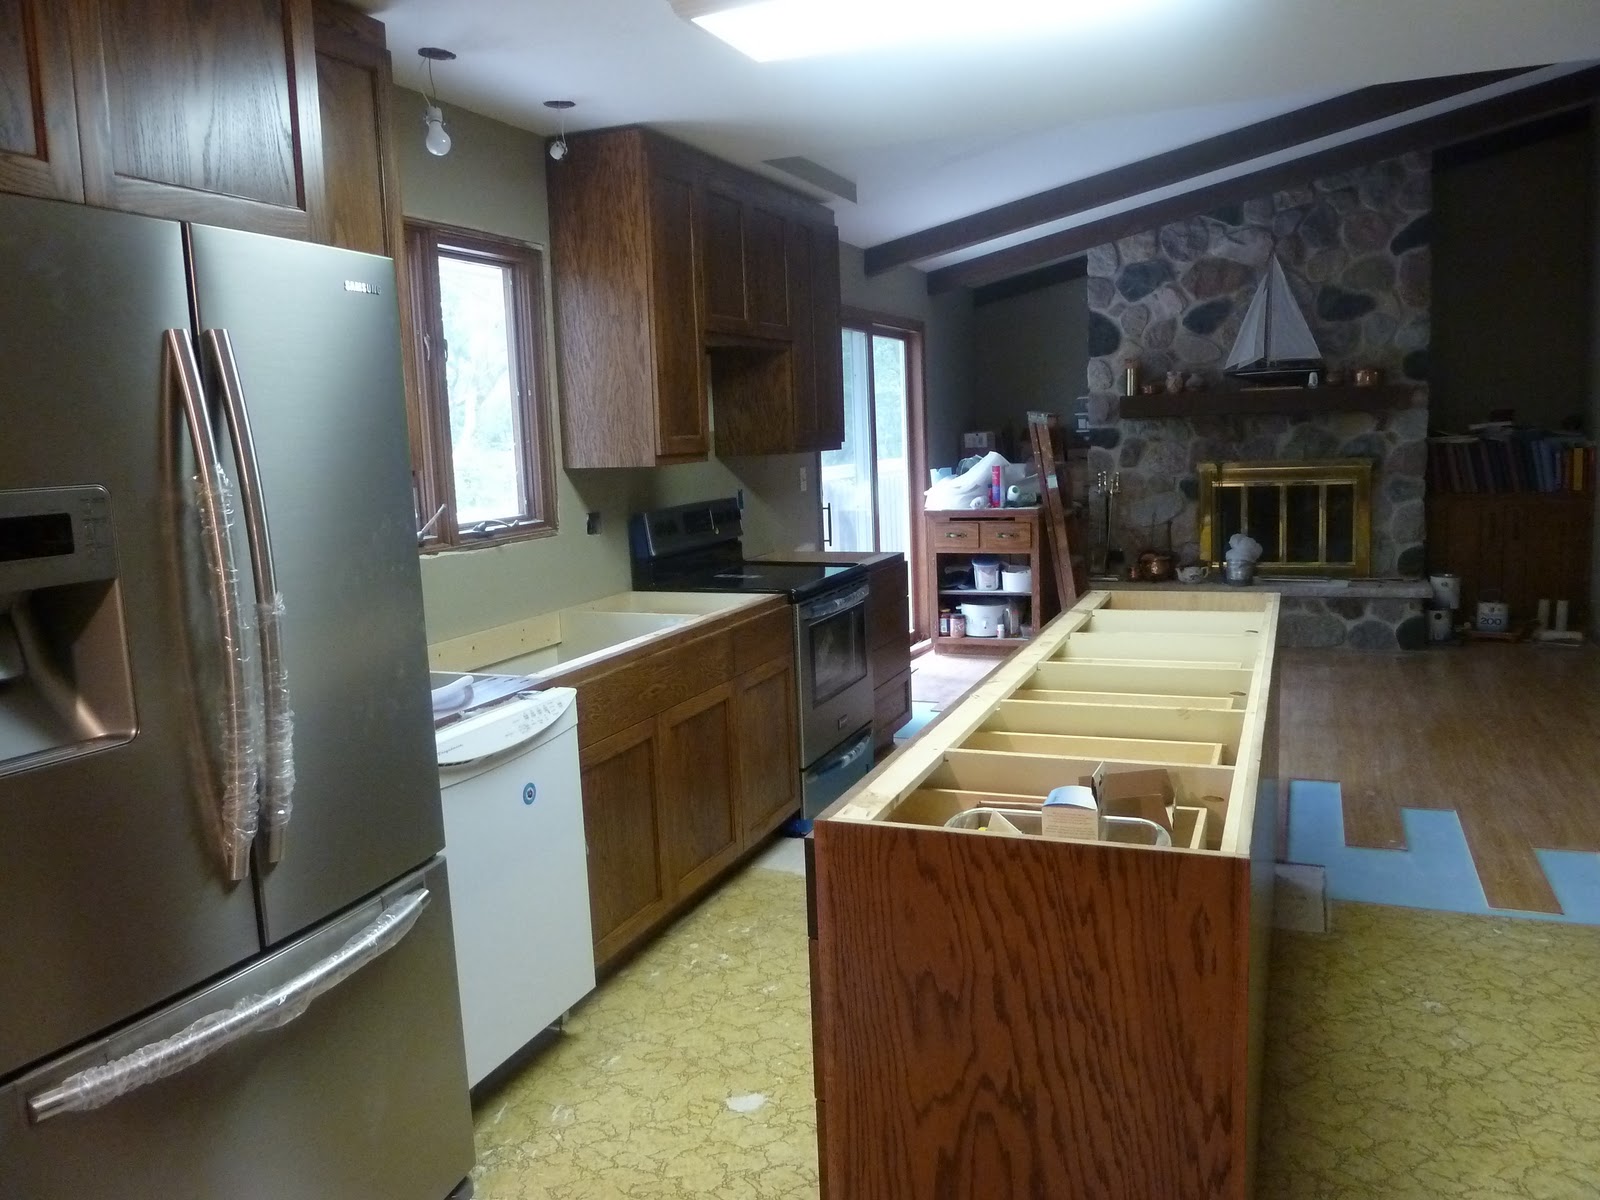
Second day of cabinet installation

Wednesday, March 23, 2011

Velux Sun Tunnels Save the Day

One of the best things we've done to make our home more comfortable is to add some Velux Sun Tunnels in our powder room and one of the bathrooms.  With our home being on a wooded lot, sunlight is at a premium, especially during winter.  Much of our indoor space is so dark it's like a cave.  And I'm too cheap to be turning on lights during the day if I can avoid it. 

So, soon after moving, I realized we had to get more light into the place, particularly the rooms that have no windows.   I got some home remodeling books from the library to get ideas on how to bring more light into rooms.  We heard about solar tubes, round skylights that don't leak as easily as the big window-type skylights do. 


The kids' bathroom is a much cheerier place
 thanks to natural light (and a fun paint color on the walls)
We looked at Solatube first.  It was about $500 to have one installed. (I don't remember what the price was for just the product.)  I didn't think that was too bad and they qualified for that federal energy tax credit program, but my husband wanted to consider all the options.  We had heard solar tubes aren't too hard to install so when we saw some Velux Sun Tunnels on sale at Menard's, we bought four.  Including some additional optional extensions, we only paid a couple hundred each (sorry, I can't remember the exact figure.)
The first one was the hardest to install, mostly because we were so nervous about cutting into the roof.  Seriously, I felt like we were committing a mortal sin!  (Thou shalt not breach thy roofing!)  We didn't know what to expect and wanted to make sure to do it when there was no chance of rain for several days.  (Just in case something went wrong.) 

View without a diffuser
(notice the year's worth of bugs)
Once we got the guts up to do it, it took my husband three hours or so for the first one.  The others took about 1 1/2-2 hrs.  I was really pleased with the results.  In the powder room we put in the provided diffuser and the light is very soft and even.  In the kid's bathroom, the kids didn't want the diffuser so when the sun is very bright, the light streaks across the walls.  They were thrilled with the nifty ever-changing patterns and thought it was cool you could see the sky.  I personally don't recommend it though, because you can also see any bugs that have fallen into the tube.  Ugh!

The light from our Sun Tunnels may not always be bright enough to perform detailed grooming tasks (like applying eye liner), but even on the darkest winter day the light is still bright enough that you can use the room without having to turn on the light.  It's really cut down on our electrical use in those rooms. 

This is the light from our Sun Tunnel
in our powder room on a gray rainy
day in March
The solar tubes have transformed the rooms where they are installed and I'd have to say that it was one of our smartest remodeling decisions.  (The only solar tube that didn't make us happy was the one we put in a bedroom.  We hadn't considered that people like it dark in their bedrooms when they are trying to sleep.  Oops!)

Anyhow, we have a few more spots where we could use some daylight.  I'd like to put some more in.  I've heard Solatube offers big ones with even more light-gathering capacity.  I do not know if Velux does.

Before we installed a solar tube
we could not use the room without turning on the light.
Even with the door open, the powder room was dark and gloomy

Thursday, March 17, 2011

Get your color on!

Sherwin Williams Biltmore Buff worked wonders in the kitchen
While the painters were dealing with our wallpaper nightmare, I needed to quick choose a color scheme.  I got books and magazines from the library, searched the 'net and ended up with so much information and choices I sort of froze.  Blankly staring at the selection of whites at the paint store was downright frightening. 

Sherwin Williams Cupola Yellow: warm and rich
Our previous home had off-white walls throughout and I wanted to try color, but I was completely intimidated.  It took me a really long time to pick colors.  The staff at our local Sherwin Williams store were quite helpful and so was our painter.  The one saleslady said that if you hold two colors up together the one shouldn't overpower the other.  I found it pretty hard to tell if colors were similiarly saturated, to be honest, but in the end I figured out a color scheme, sort-of. 

The main rooms and corridors of the house are warm creams and golds, which is sort of funny 'cuz I don't actually like yellows very much but I like what we went with.  The bedrooms and bathrooms are greens and blues.

One of the kids is a rainbow fanatic-I painted this myself
We made some mistakes though.  We shouldn't have listened to all that "these are the trends now" stuff.  Instead of opting for semi-gloss, or at least a satin, we went with flat paint in the living room, hallways and kitchen.  We had been told that people preferred the flat look.  Big mistake.  We've got kids and pets so within the year, the walls showed more dirt and stains than I ever imagined possible.  (Of course, we are probably rougher on our domicile than the average owners...I found child-sized footprints 5' up on the hallway walls.  Don't ask me how; I don't know.) 
The painters did the majority of the rooms but since the kids wanted multiple colors on their walls I did the bedrooms myself.  It saved us money and the kids really liked their fancy walls. 

Thank goodness we didn't listen when everyone told us to go with one of the "in" wall textures.  We opted for the sand, which is relatively easy to re-texture if you have holes in the walls.  Since we've painted, there's been a few.  I guess that's why people do their electrical work first before painting.  Oh well, live and learn...
The original white walls made the fireplace look garish
Didn't think I would but I LOVE this color!
The two toughest rooms were the den and the kid's bathroom.  The den has a fieldstone fireplace with a lot of pink and orange in it; not very attractive.  I wanted to mute that awful combo and went with a grayed-out green.  I think it turned out pretty nice. 

The kid's bathroom had blue fixtures of various hues and a white laminate counter.  Remodeling the bathrooms is way down on our list of priorities so I had to get a color that would tone down the bright blue toilet and tub and dark blue tile.  With the support of our painter, I decided to try a CRAZY shade of lime green (SW6703 Frolic) that turned out absolutely perfect!  I love it; it actually makes me feel happy when I look at it.

Wallpaper sucks but demolition is fun!

The shingles had to go!
 We weren't sure what to tackle first after we closed on our home but the entire home, including the hallways, was wallpapered, except for one room that had cheap paneling glued on the walls.  In the kitchen there were white-painted shaker shingles on the cabinets for that oh-so-hip alpine hut look. 

The night we closed, I jammed to hard rock radio as I took a crowbar to the shingles.  It took a few hours (the previous owners had a love affair with glue, it seemed) but I got it all down by myself.  I seem to have an affinity for demolition work.   Arrrrrr!

Next to go was the wallpaper.  I'm gonna be honest and admit that I actually liked some of the wallpaper designs but it still had to go.  Sigh. 

After a night of demolition
We had never dealt with wallpaper before.  How bad could it be?  Turns out the walls weren't prepped properly and so instead of getting the paper off, we were just shredding the drywall.  We gave up and decided to hire a professional.  We went with a painter recommended by our realtor, who had a team come in.  They steamed off what we were unable to get, skimmed the damaged walls, re-textured them and painted the walls and ceilings.  It cost approx. $6K but it would have taken us months to do what they did in a couple of weeks.

What we did wrong.  We really should have hired someone to get the wallpaper off right from the start.  We did massive damage to the walls and it took the professionals a lot longer to get the wallpaper scraps we weren't able to get, costing us more because we were paying an hourly rate.

All that damage...Yikes!

Our house is red, white and blue!

Welcome, friends!  This is the first post of my new blog, 'Wisconsin Ranch Wrangler' which will cover the ups and downs of owning and updating a '70s colonial ranch home in southeastern Wisconsin.  If you are looking for someone who has answers, this won't be for you.  But if you are looking for someone who makes a lot of mistakes when it comes to home renovation but can laugh (or at least have a good cry) about it, then come on back!  Hope you enjoy our romp!

So, a couple of years ago we moved to a small town near Milwaukee, WI.  Despite plummeting home sales nationwide, home prices were almost double what they were from the small town in central WI from which we moved.  We had thought we could find a nice place for under $300K.  Our first trip with the realtor had me in tears all the way home.  Many neighborhoods couldn't be touched for under $600K. With each trip to view available properties, we became more desperate.  We upped our upper spending limit and then upped it again and again.  We looked at homes far from civilization.  We looked at homes that needed repairs despite their expensive asking prices....without luck.


Did I mention the house is red, white and blue?
We had a decision to make.  Spend almost double what we wanted for a newer home that needed repairs, or look at inexpensive homes that were smaller and older than what we currently owned.   After months of searching (our realtor had mostly given up hope), we found the right place.  A 1900 sq. ft. '70s ranch with a walk-out basement and 3-car garage, two amenities that seem rare around here.  It needed updating badly but it was a bargain and well, how much work could renovating a house on a tight budget be?